-40%
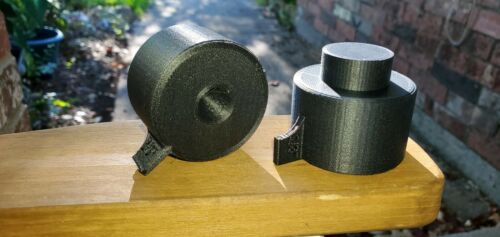
1963 To 1976 SAFE C2 & C3 Corvette Hood Alignment tool
$ 5.27
- Description
- Size Guide
Description
Auction is for ONE 1963 To 1976 C2 & C3 Corvette Hood Alignment tool.THIS IS SAFER THAT SIMILAR ALL METAL ONES THAT IF DROPPED ON YOUR FENDER, WILL RUIN YOUR PAINT AND RUIN THE DAY!
Condition is New.
Shipped with USPS Priority Mail.
These are LIGHTWEIGHT PLASTIC, YET STRONG!
I Designed these in Tinkercad and sliced with CURA, they are 3d printed, each print takes almost 2 hours to finish, then they are cleaned up and inspected for any structual issues.
Unlike THE SOLID aluminum ones (that cost a fortune), if you WERE TO ACCIDENTALLY drop a similar solid one on the fender, or if it slips out of the latch, it won't ruin your paint as these are plastic, lighter, and much safer!.. yet still do the job. Being lighter, they qlso are much less likely to fall out in the first place.
A
g
a
i
n
,
y
ou are getting
one (1) for this listing.. But for around half the cost of one metal billit one.. you could order 2 of these to align quicker with someone on the other side without having to pass one back and forth but it isnt nessasary yo have 2.
To use. Use just like you would with an all metal one, you can do one or order 2 for both at same time with a friend.
Note.. this is made with a tapered pocket and have a 1/8" thick tab attached for checking slack of the cable without guessing and also can be used to check gaps on fenders.
Hood Alignment instructions
Preparation
:
To use, first make sure the front, tip, and sides of hood are aligned with same gap width everywhere on all sides.
There are good youtube videos that describe that process.
Then check that you have 1/8" play on the cable to the arm play using the tab on the side of the tool, adjust accordingly.
Then, insert these into hood latch holes. The assembly spring pressure SHOULD hold them in place.. but to be safe.. test tension is ok before continuing.
If it is not staying up in the latch by itself... You either have a weak spring, or more likly a bent, or rusty and stuck latch assembly. Fix that before continuing! I found dipping the assembly overnight in evaporust thsn lubricating with a light coat of grease on moving parts clears that issue right up, after your springs and latches are operating smoothly and not binding...clean install, insert tool.. then move on to next step.
Have a friend on one side or you can do them one at a time with one..
Make sure the hood hinge bolts are all tightened up as well as the latch assemblies are tightened up evenly. Do not use the bolts on the latch assembly to align the pins and dint torque them to the moon either. And when installing any latch assembly do not do it while it is under spring pressure from the cable.
Disconnect the cable first to install new latches or when insuring the old assemblies are tightened up in the proper place with all centered bolt holes, then re-attach cable and recheck play in cable to 1/8" again. (Use the cotter pin to get a little tension with the adjustment bar holes, start on the middle and practive opening with the lever with your hand and thumb to make sure bith sides operate s.oothly and are evenly opened when applying pressure.
HOOD TO PIN ALIGNMENT
:
Using a 1/2" (or 13mm) ratchet or wrench, loosen all nuts on both sides of the cone/pin assembly mounts beside the fenders, then slowly lower the hood and move/position the cone/pin assembly until the cone tips are aligned inside the tapered hole evenly.
This will center them equally when hood is lowered all the way.
Make sure to adjust with just the weight of the hood, and that your hood gaps are still even after. Note. If your latch assembly is bent or rusty. You need to first r&r it.
Tighten up the 1/2" nuts on both the Pin spring assembly.
Double check with tool on each side for even contact. This is where a set makes it a little easier. But not nessasary.
Remove the tool/s.
CLOSING HOOD:
Now slowly lower hood but do not shut hood fully, just lightly set it on the pins.. and look inside at a angle on drivers side to verify the metal tab (on the latch assembly on drivers side ) when the hood is laying on its own weight is very close to the arm (the part that moves forward when you pull the hood) release cable. If you have a gap larger than 1/8" to the other tab, use channel locks or a adjustable wrench and slightly and carefully bend it to where you have 1/8th or less gap (WHEN PULL HANDLE IS PUSHED FORWARD AND FULLY CLOSED)
At this point, apply just a little 1/2" of pressure on the hood on drivers side and on the passenger side. (Use a frend if you can, to help to test this at same time. Or if by yourself, just walk arond and push down slightly) just a half a inch or so to feel the springs, and verify the hood is not sliding sideways as you apply downward force. you should now feel just the springs as you apply a small amount of pressure. Do this a few times.
If you feel anything other than just the springy action, stop. And investigate that the pins are only hitting the inner latch arms and not the sides.
if you still feel it is uneven or catching (or if hood is moving to one side or other while collapsing spring, this also is a sign it isnt set even, chances are the latch may be bent or rusty and not centered on the cone.
Now you are ready to try it out!
First time, do not slam or drop it shut.
Push it till it clicks amd locks on the drivers side then walk to passenger side and push and lock. Sometimes the drivers will open when doing it this way. Or the passenger wont latch.. That is ok. If so move the tab on the cable bar with holes in it over one pin at a time whichever way. until it is smooth and layches on both sides.
Move pin towards the passenger side if it is NOT latching on passenger side and move it towards drivers side left facing it when hood is up to loosen it so the drivers doesnt pop open when the passengers side is pressed in.
After this test succeeds, then you can shut normally by dropping hood from 8" or so.
If you get stuck. There is youtube videos on gow to unstick. Basically there is a rubber grommet /hole in the wiper area you remove then trigger the lever with a long screwdriver and try again.
Msg me if you have any issues. Will ship random color of filiment unless you specify color in a message anf I have it in stock.
Thanks
Sean


